Having grown up in a traditional Italian family, pasta was part of my natural landscape. But today, pasta comes in many varieties. I don’t mean just shapes—those have always been. I mean ingredients. And because so many people are carb conscious, and/or avoid wheat, pasta manufacturers have come out with pasta made from wheat flour alternatives. It is now made of quinoa, farro, corn, kamut, black bean flour, and other ingredients.
For this recipe, I found a beautiful red lentil pasta. It’s made with 100% red lentil flour in place of regular flour, so it’s completely gluten free. Its flavor is earthy and nutty, and it pairs very well with sautéed mushrooms. Unfortunately, like any brightly colored foods, they lose their pretty pinkish hue once cooked. I found this particular bag at Eataly in Manhattan, but you can find “alternative” flour pastas in large supermarkets, Italian markets, gourmet shops, and, of course, online.
Enjoy!
Red Lentil Pasta with Sauteed Mushrooms
1 tablespoon olive oil 8 oz. baby bella or cremini mushrooms 2 teaspoons kosher salt 8 oz. red lentil pasta ½ tablespoon salt Freshly ground black pepper to taste ¼ cup grated or shredded parmesan cheese
Heat the oil in a wide skillet, preferably cast iron. Add the mushrooms and 2 teaspoons kosher salt and sauté over medium-high heat, stirring occasionally, until the mushrooms have browned. This will take anywhere from 20 to 30 minutes.Fill a medium saucepan three-quarters with water and bring it to a boil. Add the pasta and ½ tablespoon salt and cook, stirring often, until it’s al dente, about 10 minutes. Drain and transfer to a bowl.If the mushrooms have cooled off, reheat them briefly. Add them to the pasta and season with pepper. Mix in the parmesan. Serve hot.
Sweet potato noodles are made from sweet potato flour. When cooked, they have a chewy, firm texture and a vaguely sweet-ish flavor. Paired with broccoli, it makes a savory, fun meal. The tomato gives the dish a fresh dimension, and a splash of soy sauce at the end rounds out the flavors with a burst of salty sweetness.
You can find sweet potato noodles in Asian markets. They look similar to rice noodles with their lovely translucency. If the brand you choose has the noodles in coils or long ropes rather than sticks (like spaghetti), I suggest breaking them up because they can be really long and difficult to eat, and because they tend to cling to each other for dear life, you might end up with huge mouthfuls of noodles.
These noodles are, of course, gluten free, and vegan, so they’re perfect for anyone on a gluten-free diet, Paleo, Keto (a little, according to their site), etc. The whole family is covered here. They’re inexpensive as well. Give them a try sometime.
Sweet Potato Noodles with Roasted Broccoli and Tomato
Makes 4 servings.
1 small head broccoli, cut into florets 2 tablespoons olive oil 3 teaspoons kosher salt 6 ounces sweet potato noodles ½ cup chopped tomato 1 tablespoon soy sauce
Freshly ground black pepper to taste
Preheat the oven to 375 degrees F.
Toss the broccoli with 1 tablespoon of the oil and 2 teaspoons of the salt. Spread the florets out on a baking sheet and roast 10 minutes. Stir and roast another 10 minutes, or until the florets are tender and browned.Bring a medium pot of water to a boil. Add the noodles and simmer over medium heat, stirring occasionally, until they’re tender, about 5 to 7 minutes. Drain.In a medium bowl, combine the noodles with the broccoli, tomato, soy sauce, remaining oil, remaining salt, and black pepper. Mix well. Add more oil, if necessary (the noodles will want to clump together).Serve hot. Heat leftovers in a wok or pan with a little water in the bottom, covered. Enjoy!
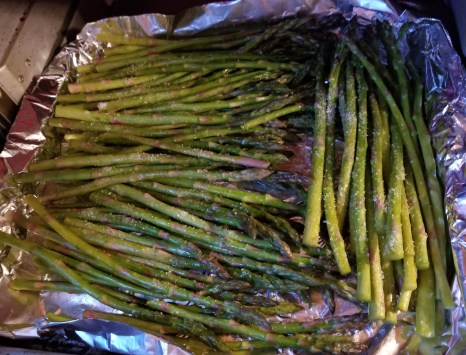
This recipe is a combination of two classic Italian pasta dishes: aglio e olio (garlic and oil) and asparagus with lemon-pepper sauce. (Both individual recipes, by the way, can be found in my pasta edition of the Vegetarian Italian: Traditions ebook series.)
One night after work, I was contemplating dinner. I wanted to do something a little different, but I wanted to keep it easy, and not stray too far from familiarity (I was tired and irritated from work, so simplicity and comforting were my top criteria).
Pasta is always easy, always comforting, and I had just happened to buy a bunch of pencil-thin asparagus. I also had lemons…and so I came up with this. Two savory Italian classics in one delicious dish, and the combo is not any more work than just one recipe alone.
Farro is an ancient Italian grain that is related to spelt and emmer, but is not actually spelt, as some believe. It’s commonly used in Italy, but is becoming more available in the U.S. Farro pasta is nutty, nutritious, low in calories, and is often well tolerated by people with gluten sensitivity (although those with Celiac disease should avoid it). Farro pasta can be found in Italian groceries, as well as gourmet shops. And, of course, online. Try it—I think you’ll find it an addicting alternative to whole wheat pasta.
Enjoy.
Farro Linguine with Asparagus and Lemon-Pepper Sauce
1 pound asparagus 1/3 cup olive oil 1 tablespoon kosher salt, plus more to taste ½ lb. farro linguine (or other long pasta)
2 large garlic cloves, sliced ½ teaspoon paprika Freshly ground black pepper to taste
Zest from 1 small lemon Grated parmesan cheese
Extra virgin olive oil for drizzling
Preheat the oven to 350 degrees F.
Snap or cut off the woody bottom stems of the asparagus and discard. Place the asparagus on a platter, drizzle with half the oil, sprinkle with half the salt, and gently toss. Try to keep the asparagus all facing the same direction (this will make it easier to handle).Place the asparagus on a baking sheet lined with foil and roast until tender and lightly browned (the time will vary depending on the thickness of the asparagus, but anywhere from 10 to 20 minutes). Remove them from oven and chop them into bite-size pieces.Bring a medium pot of water to a boil. Add the pasta and remaining salt and bring it to a boil, stirring often, until al dente, about 8 to 10 minutes. Drain. Transfer the pasta to a serving platter. Add the chopped asparagus.Pour the remaining olive oil in a small pan with the garlic. Heat until the garlic is fragrant and just starts to color, about 2 to 3 minutes. Sprinkle in the paprika, swirl it, then immediately pour it over the pasta. Season with more salt and grind on as much black pepper as you like.Sprinkle the lemon zest over it. Top with the grated parmesan and drizzle a little extra virgin olive oil. Serve.
Homemade milks are a beautiful thing. They are fresh and light in a way that no store-bought milk can be, no matter how good the quality of a brand may be. Your own milk also will not contain unnecessary ingredients. The best part is, they’re not difficult to make.
The latest thing right now is oat milk, and it’s probably the easiest of all homemade milks to make. You just dump all the ingredients in a blender and go. If you have a Vitamix, or other high-powered blender, now’s a great time to use it!
Oat milk tends to be a little flat in its purest form, so many people add a sweetener to it. I chose to add honey, but you can add whatever you like, or omit it altogether. I also chose to add a pinch of salt to enhance the flavor of the milk.Continue reading →
Summer is finally here, and with the coming of sunshine and warm breezes comes the need for pasta salad. After all, you need something easy to bring to all those picnics, barbecues, and beach parties, right?
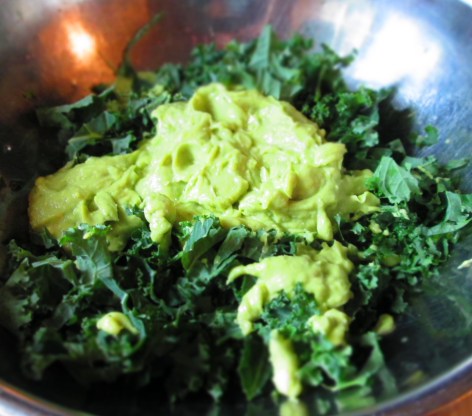
Pasta salad, however, need not be fattening or unhealthy. In fact, it can be quite the opposite. This pasta salad calls for whole wheat pasta, which already is healthier than regular pasta salad, but you can use gluten-free pasta as well. Rather than mayo or other fat-laden dressing, this one uses avocado. It makes the pasta creamy, rich, and loaded with nutrients (plus some good fat). Add raw kale to the mix and you’ve got a healthy, but delicious, alternative.
Kale can be tough, but squeezing kale with avocado softens the leaves. The salt in the dressing further breaks down the cell walls of the kale, helping it along its journey to tenderness.
This is an excellent start to the summer. Enjoy!
Whole Wheat Pasta Salad with Kale & Creamy Avocado Dressing
Makes 4 servings.
8 oz. cherry tomatoes, halved 2 teaspoons olive oil 2 cups whole wheat pasta 2 teaspoons table salt 2 Haas avocados 2 tablespoons lime juice ½ teaspoons sea salt Freshly ground black pepper to taste 2 packed kale leaves, shredded* 2 tablespoons extra virgin olive oil 1 tablespoon balsamic vinegar 1 teaspoon red pepper flakes (optional) ¼ cup grated parmesan
Toss the tomatoes with the olive oil in a small bowl. Spread the tomatoes out on a small baking sheet lined with foil and roast until soft and charred, about 20 minutes.Bring a medium pot of water to a boil. Add the pasta and table salt and bring to a boil. Boil over medium-high heat, stirring frequently, until the pasta is al dente, about 8 to 12 minutes (depending on what pasta you choose). Drain and set it aside while you prepare the sauce.
In a food processor, combine the meat from the avocados, lime juice, 1 tablespoon of the extra virgin olive oil, sea salt, and black pepper. Process until smooth.Place the kale in a medium bowl. Pour the avocado sauce over it and squeeze the kale with your hand until everything is well blended. Mix in the balsamic and red pepper flakes, if you’re using it.Add the cooked pasta and parmesan and mix well. Taste for seasoning and adjust it to your liking.Transfer the pasta to a serving bowl. Serve warm, at room temperature, or cold.
*To shred kale, first strip the leaves off the stems by lightly pinching the stem and running your fingers down the stem to the tip, pulling the leaves off along the way. Stack a few leaves and roll them up into a tight log. With a sharp knife, slice the kale thinly.
Celery root, also known as celeriac or knob celery, is one of those vegetables that confounds many people. What is it? Is it really the root of the celery plant? What do you do with it? What does it taste like?
Celery root is related to celery, but it’s a different variety. Whereas celery is cultivated for its stalks and leaves, celeriac is cultivated for the root. Its flavor is definitely celery-like, only deeper and earthier. It’s kind of off-putting in its appearance—big, bulbous, knobby, and usually dirt-encrusted—and is not used as commonly as other root vegetables. But like so many overlooked vegetables, it’s rising in popularity.
As to what you can do with it, many things. You roast them, saute them, gratinee them, use them in soups and stews, and, as in this recipe below, puree them for a smooth, silky bisque.
Celery root bisque is often thickened with potatoes, but I’ve chosen instead to use oats, a trick I learned in culinary school. Oats not only increases the soups nutrition factor, but also makes it less starchy.
Speaking of nutrition, celery root contains vitamin C, vitamin K, vitamin B-6, potassium, phosphorus, and fiber. It’s been shown to be beneficial for bone health, heart health, and lowering the risk of diabetes.
Enjoy!
Celery Root Bisque with Oats
Makes 6 to 8 servings.
2 large celery root knobs 2 tablespoons olive oil 4 cups chopped celery ½ cup chopped shallots 1 tablespoon kosher salt 5 cups vegetable broth 1/3 cup rolled oats ½ cup parsley* 2 tablespoons fresh thyme* Freshly ground pepper to taste
*Don’t worry about chopping the herbs or if you have some stems. They’re going to be pureed.
Peel the celery root with a knife or vegetable peeler. Cut up the roots into cubes (you should get about 10 cups).Heat the oil in a large soup pot or Dutch oven. Add the celery and shallots and ½ teaspoon of the salt and sauté until softened, about 5 or 6 minutes.Add the celery root and 1 teaspoon salt and stir. Pour in the broth and add oats. Bring to a boil; lower the heat to medium-low, and simmer, covered, until the celery root is tender, about 40 minutes. Stir occasionally.Stir in the parsley and thyme and remaining salt.Transfer the soup in batches to a blender and puree until smooth. Pour each batch into a bowl. When all the batches are in the bowl, stir it to blend. Add pepper and stir. Taste the soup for seasoning and add more salt and pepper, if desired.If you’ve made the soup ahead of time, pour it back into the pot and heat gently over medium-low heat before serving.
Keep it stored covered in the refrigerator up to 5 days.
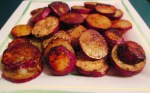
Japanese yams, also known as satsumaimo, are considered a type of sweet potato. They have a purplish skin, but unlike the sweet potatoes Westerners are used to, Japanese yams have a whitish flesh. They are sweeter than white potatoes but less sweet than orange sweet potatoes. (I don’t call sweet potatoes yams because, really, yams are a completely different thing. But I won’t go there right now.)
Although Japanese yams are low in protein, they are high in vitamins and minerals, such as A and C and potassium and fiber, antioxidants. And it is said by some that they have anti-aging effects. I don’t know if that last part is true, but Japanese yams still make a healthy alternative to white potatoes, and even standard sweet potatoes. They’re perfect for anyone with wheat issues, or who are on low-calorie diets because, yep, they’re low in calories, too.
A lot of fuss has been made around Japanese yams in the last few years. In fact, there’s even a diet with Japanese yams as the focus. They have been touted as a powerhouse health food. I’m clueless as to the validity of this belief, but what I do know is that they’re delicious, and including them in your meal plan is another way to diversify your vegetable intake.
This recipe is very quick and easy and makes for a flavorful side dish for any meal. Enjoy!
Balsamic Roasted Japanese Yams
Makes 4-6 servings.
2 lbs. Japanese yams, rinsed 1/3 cup olive oil 2 tablespoons balsamic vinegar 2 teaspoons kosher salt 1 teaspoon onion powder 1 teaspoon garlic powder 1 teaspoon dried basil 1 teaspoon dried parsley 1 teaspoon dried oregano Freshly black pepper to taste
Preheat the oven to 375 degrees F.
Trim the ends off the yams and discard. Slice the yams into ½-inch circles and place them in a medium bowl.In a small bowl, whisk together the remaining ingredients. Pour this over the yams and mix well so that all the yams are coated.Get a piece of foil large enough to enclose all the yams and lay it flat. Transfer the yams to the foil and close it tightly to form a packet. (If you can’t do it with 1 piece of foil, then make 2 packets.)
Place the packet(s) on a baking sheet and roast for 30 to 40 minutes, or until they’re tender when pierced with the tip of a knife. (You will have to open up the foil to test them.)When they’re tender, open the foil carefully (the steam will be hot and can burn you) and spread it out flat. Spread the yams out as evenly as possible, and put them back in the oven for another 10 minutes to brown. Turn them over halfway through to get both sides browned. Taste for seasoning and sprinkle them with more salt, if desired.
Transfer them to a serving platter. Serve immediately.
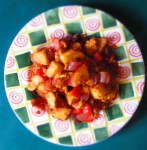
Hash is one of those kitchen sink recipes—it can be made with anything you have on hand—but usually requires potatoes to be considered hash. It used to be a way for restaurants to salvage scraps of food, leftovers from other dishes. And while it’s still a utilitarian dish that helps people use up scraps, it’s become standard dish in its own right. It’s become a breakfast staple with many variations. This is a healthy version because it features tempeh.
Originally from Indonesia, tempeh is a fermented soybean cake. Indonesians consider it a meat substitute and, in fact, it is high in protein. It makes the perfect meat alternative for vegetarian dishes, as it does in this hash recipe. Have it for breakfast, or any other meal.
This is both an excitement and a relief because this book has been on a long and arduous trip. I first got the idea for it, and began researching recipes and cuisines for it, in 2002. I spent many years testing and developing recipes to duplicate the dishes I’d read about and sampled, but in such a way that they would stay true to the originals as much as possible while making them meatless.
M’Baazi
I started with a list, and that list grew and grew. Over the years, I added recipes, deleted recipes, changed recipes, and in a few cases I was so determined to make a particular recipe work that I just kept testing and testing until I came up with the right result. Sometimes a recipe simply didn’t work and I tossed it. Occasionally I would discover that I’d confused one dish for another, and sometimes I had a recipe that I couldn’t find the proper name for in its originating culture. In those cases, I researched high and low on the internet and in books and magazines, asked friends and coworkers if they knew, asked friends to ask their friends and coworkers if they knew, posted questions in special interest groups on Facebook, etc. I found out the answers to some, and found out that I had others all wrong.
An Indian Feast
As I met and talked to more and more people from different cultures, my list expanded but, oddly, also shrank. So many cultures have more common threads than we imagine, and as I started to examine my recipes, I began to realize that there were more similarities than differences. It was a fascinating and educational journey I went on.
Pot Stickers
The one thing I’ve learned from this project, if nothing else, is that no matter what clothing people wear, what religion they practice, what rituals they perform, what kinds of jobs they hold, or how much money they have, we are more similar than we are different. You can see this in the very similar dishes that are shared between nations, with maybe just a spice or two, or a cooking method, differentiating them.
Arepitas with Black Bean-Corn Salsa
Eating is the one thing that every single human being on earth must do to survive, so it’s no wonder that food is the common bond across the planet. No matter where you go in the world, a signal that you are welcome is the offer of food. When you are a guest at someone’s home, it always gives your hosts tremendous pleasure to feed to. It is the global sign of hospitality, and many customs and rituals were created around food. In some places, to refuse food is an insult, or to not finish it all is a sign of poor manners. Some cultures expect you to belch loudly when you’re done to show that you are satisfied.
Food always brings brings people of the world together.
Australian “Roo” Burgers
It’s my hope that through food, we can find common ground and sit at the table together to share a meal.
So take a trip around the world. If you can’t do it physically, do it in your kitchen and at your table. Try new recipes and explore new flavors, and invite your friends and loved ones to share in the journey. Most of all, enjoy it. Peace.
Still looking at the bowl of leftover cranberry sauce in the fridge? The nice thing about cranberry sauce is that it has a pretty long shelf life (the sugar acts as a preservative). But the question is always, what do I do with it all?
Well, I’m here to help. Once again, here is my list of 12 things to do with leftover cranberry sauce.
Mix a tablespoon of it into chicken or tuna salad.
Make a salad dressing. Add 1 or 2 tablespoons to a homemade vinaigrette.
Use it as a sauce for meats, vegetables, fish, and (my favorite) vegetarian “chicken” patties.
Mix about ½ cup to 1 cup of it into cheesecake before placing it in the oven. (Just swirl it in; don’t overmix.)
Dollop some on top of slices of pound or angel cake.
Stir about 1 cup of it into a big pot of chili.
Make ketchup out of it—add it to a traditional homemade ketchup recipe.
Turn it into salsa by adding some minced jalapeno or some chili powder and cumin to it, or a chutney by adding other dried or fresh fruits, such as raisins, chopped dates, or chopped apple.
Use it as jam for toast, muffins, or bagels.
Mix about ¼ cup into muffin batter (these will be the best cranberry muffins ever!).
Use it as an ingredient in homemade ice cream.
Add it to a breakfast bread.
This recipe is a healthy loaf (which many people appreciate after Thanksgiving), using whole wheat flour and flax seeds. You can have a healthy post-Thanksgiving breakfast or snack while still enjoying holiday flavors. You don’t need a lot of sugar, either, because there are sweeteners already in the sauce. As for the flax seeds, use a clean coffee grinder to grind it until you get a coarse powder. Enjoy!
Cranberry Sauce-Walnut Bread
1 cup whole wheat flour 1 cup all-purpose flour 1 tablespoons flax seeds, ground 2 tablespoons sugar or maple crystals 1 teaspoon baking soda ½ teaspoon ground cinnamon ¼ teaspoon allspice ¼ teaspoon nutmeg 1/2 teaspoon salt 2 large eggs 3/4 cup buttermilk ½ cup cranberry sauce ½ cup chopped walnuts
Preheat oven to 375 degrees F. Line an 8 x 4-inch loaf pan with parchment paper so that parchment sticks out of the sides (or grease it very well).
In a medium bowl, whisk together flours, flax seeds, sugar, baking soda, cinnamon, allspice, nutmeg, and salt.In a small bowl, mix together eggs and buttermilk.Mix this into the flour mixture just until all dry ingredients are moistened.Stir in the walnuts. Swirl in the cranberry sauce, but don’t mix it in completely—you just want it to run through the batter.Spoon batter into loaf pan. Bake until lightly golden on top and a toothpick inserted in the center comes out fairly clean, about 20 to 25 minutes. Some moist cranberry on the toothpick is okay.
Set pan on a wire rack to cool for 10 minutes. Turn loaf out onto the rack. Serve warm or cool completely.
If you have any cranberry sauce left, dollop a spoonful on each slice.


 Fill a medium saucepan three-quarters with water and bring it to a boil. Add the pasta and ½ tablespoon salt and cook, stirring often, until it’s al dente, about 10 minutes. Drain and transfer to a bowl.
 If the mushrooms have cooled off, reheat them briefly. Add them to the pasta and season with pepper. Mix in the parmesan. Serve hot.


 At long last, I can finally announce the release of my latest cookbook,


 thing about cranberry sauce is that it has a pretty long shelf life (the sugar acts as a preservative). But the question is always, what do I do with it all?

 In a small bowl, mix together eggs and buttermilk.
 Mix this into the flour mixture just until all dry ingredients are moistened.
 Stir in the walnuts. Swirl in the cranberry sauce, but don’t mix it in completely—you just want it to run through the batter.
 Spoon batter into loaf pan. Bake until lightly golden on top and a toothpick inserted in the center comes out fairly clean, about 20 to 25 minutes. Some moist cranberry on the toothpick is okay.
